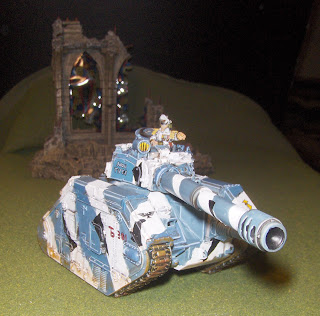
All Russ variants are built from a standard chassis, so modeling a lower profile hull requires more time, energy and experience than I am prepared to expend. I settled for using the resin turret I purchased from Forgeworld ages ago, which not only sports the immense Vanquisher cannon, but is also about one third lower than the standard turret. To keep the aspect lean and mean, I left off the optional side sponsons, which, while increasing the firepower, also brings a matching increase in the points value of the tank. I did opt to upgrade the hull-mounted heavy bolter to a lascannon, so if the turret should become disabled, it can still serve as a tank-hunter of sorts. I added the track-guards initially out of esthetics, but also use them to reflect the extra armour upgrade, making the tank a bit more resilient.
I was unsure exactly how I was going to set up the camo pattern on my tanks, but a staffer at The Game Store in Red Deer (great place if you get a chance to check it out!), told me how he had used Silly Putty as a mask on his WWI models, so I bought a couple of eggs worth at Toys R Us. After priming the entire model white, one egg was sufficient to cover about half the hull and turret in a vaguely striped design, which I then sprayed with a can of positively ancient Shadow Grey spray, which has been out of production for many years.
It only took about ten minutes of shaking to get the marble loose enough that I was willing to gamble using the spray; removing paint from plastic models is exceedingly tedious and not always effective, while re-priming the model always results in a significant loss of detail, so I was a little skittish, but it turned out pretty well. The Silly Putty worked well and came off fairly easily once the spray was dry. The only down side was that the colour of the spray was not only different from the Shadow Grey I had in a pot, but required a mix of Shadow Grey, Space Wolf Grey and a touch of Scaly Green just to get close! This meant touch ups and corrections were going to be a real chore. On the plus side, the colour settled well and left its own highlights on many of the edges and high points, so I will definitely be using it again.
I used a wash of Devlan Mud to weather the hull , but it didn't dry evenly, and made a bit of a mess in some places. I was mostly able to cover it up, and where I couldn't, it ended up looking like a little more grease or grime, and did help to contribute to making the tank look more lived in. I added some black triangles to reinforce the disruption pattern of the camo and to provide a little contrast as well.
I had already decided to use white uniforms on my officers and veterans, so I painted the tank commander likewise. He had more detail than I expected to find, which made him a bit more difficult to paint, especially as I was trying to complete it before Sunday's Halloween and birthday shenanigans. Still, I am pretty happy with how he turned out, and intend to use him as tank ace Knight Commander Pask. The tank itself I intended to call 'Snow Tiger' from the get-go, and added the name to the turret, with some Cyrillic letters thrown in here as well as in the tank number for good measure.
Looking at it now, I realize I still need to finish off the backpack sitting on the back of the hull, and also want to find a space to add some 'kill markings', but it is certainly ready for the tabletop as is, and those additions shouldn't take more than a moment or two next week prior to varnishing it.


No comments:
Post a Comment